Posted on

Is My Soil Ready To Plant?

Consider these important factors before popping seeds into the soil:

1)    Soil temperature: Most seeds aren’t going to be thrilled if their future home is below 50 degrees. Who’s to blame ‘em? Brrrr. Get yourself a soil thermometer and find out if you’re in that temperature ballpark before direct sowing most things. The exceptions are poppies, larkspur, sweet peas and calendula which are more-cold hardy than their flower friends. Kale, radish and arugula are the cool guys of vegetable town.

2)    Soil Moisture: Take a handful of soil about 6″ deep and squeeze it. If it forms a wet, slippery ball and excess water oozes out, the soil is still too wet to work. If it forms a weak ball that breaks apart easily, you’re ready to go!

3)    Ground cover: If your soil still has cover crop, grass, weeds, or other active plant life growing it, hold up! Your precious seed babies can’t compete for light and nutrients with plants that have an unfair head start. There are also likely a bunch of little munchers (Slugs! Ahh!!) hiding out in that matter. Pull the material out or chop it up and allow time for it to decompose. Large chunks of dead plant debris will also bind up nitrogen in the soil. Bacteria will use it to grow, multiply and further break down the plant matter.

If you want to expedite warming and decomposition, you could try tarping, building raised beds or double digging. Tillage also helps speed things up by breaking down plant tissue and oxygenating the soil. However it comes with a host of drawbacks for soil heath, so use judiciously! We use a few silage tarps ourselves to keep the soil a little drier and warmed up for early spring crops. Once we’re out of March, we prefer to keep our plastic use to a minimum and let our sheep eat down cover crop, before doing some light bed prep with the ol’ tractor.

Posted on

Meet Midnight Crunch Lettuce! A Deep Harvest Original.

We’re more than excited to release this shiny new lettuce in the wild. Introducing… Midnight Crunch! An upright, dark burgundy-colored deer tongue variety with excellent market potential. Adds beauty to your farmers market display or mixed with other salad greens. This year, we tested the finished product on unwitting CSA members and received rave reviews! “So stunning!” “So crunchy!” “Wow, that color!!!”

Midnight Crunch was first conceived down in fields of Wild Garden Seeds, where lettuce breeder Frank Morton made crosses of several varieties including Deer Tongue, Merlot, Crisp Mint and Reine d’ Glaces. He sold the resulting seed from these crosses through his catalog under the name “Freedom Mix.” This was a gift to potential plant breeders or folks simply fascinated with lettuce diversity. (You can find several other diverse breeding populations with different parentage on Frank’s website). We planted the “Freedom Mix” back in 2021 and saved seed from several plants that exhibited unique, upright red romaine traits. Since then, we have replanted the seed every year and made selections on our favorite plants, eliminating traits such as bitterness, spines on the ribs, tip burn and early bolting.  We think you’ll love the results.

Posted on

Succession Planning for Garden Success

I’m sure I’m the last one on earth to notice, but I’m still pretty pumped to find “success” in the word succession. Obvious? Yep. Cheesy? Mm-hmm. But accurate? 100%! Especially if you want tender, tasty greens in your garden for the long haul.

You don’t need to focus on succession planting in your first year of gardening, but as you hone your skills its importance is evident of you don’t love bolted lettuce salads and hard-to-chomp chard come mid summertime. The nitty gritty of succession planting is that we need to plant some crops more than once in order to eat (and actually enjoy) them for prolonged harvest periods.

The chart below demonstrates how often we plant various greens to keep them at optimal flavor and texture for our customers. Most gardeners can get away with extending these timeframes if you keep them well fertilized, don’t pick your crops super hard or don’t mind them a bit spicy, bitter, or tough. Many tender, annual greens (arugula, mizuna, tatsoi), however,  can’t be extended even with  extra TLC, as biology compels them to bolt after a few weeks.

Dates underlined in bold indicate that we recommend starting plants indoors and transplanting them out in 2-3 weeks. Indoor seeding is ideal when cool soil temps inhibit outdoor germination. We also start all bunching/heading greens (kale, chard, collards, cabbage, radicchio, head lettuce) indoors no matter the season, as we like to space the transplants with precision in the bed to optimize yields and harvest efficiency.

Look out success. Here you come!

Posted on

February is the Time to Seed Your Alliums

Garden enthusiasts, start your engines. On your marks, get set…. SEEEEED. No really, we’re truly ok with you starting now, but ideally only alliums (and perennial herbs and flowers). February through mid-March is indeed the ideal window to start your onions, leeks, and scallions indoors. Yee haw! Here we go.

At Deep Harvest, allium seeding entails planting seeds in seed starter mix at 1/4-1/2 inch deep, about five seeds per inch in rows in open flats. We place the flats on heat mats set around 55F°, but remove them when germinated. Too long on the heat is seriously stressful for those tender babies. Once plants are about 6 inches tall, we give them a couple inch haircut (aww) and allow them to continue sizing up until outside soil temps hit 50F°. Then it’s out of the nest and into the great wide open to fend for themselves. Don’t worry, you’ve raised them right!  At this point, we trim the roots to ½-1 inch long so they don’t J-root in the soil when planted and we even give ‘em a little liquid fertilizer dunk. Plants are pushed in about one inch to cover their roots and plant bases and are spaced at about 5 inches in rows 12 inches apart.  That’s all there is (all-lium there is?) to it, folks!

Posted on

Early January is Time to dream not to Plant!

Howdy-do, gardening friends! It’s time for our near-annual public service announcement about weather, microbes and patience. Let us explain. While it’s easy to celebrate the rare sun fleck breaking through our January perma-cloud, don’t let that excitement lead to rash seed sowing. This time of year in western Washington our soil temps hover in the low 40s, too cold for even the hardiest seeds to thrive. Those that do manage to sprout encounter rain, frost, slugs, fungal disease and, most importantly, an absence of sunlight which threaten seedlings’ chance of survival.

We used to start our CSA in early May and pride ourselves on being early to farmers markets with carrots, broccoli and zucchini. But over the years we learned battling cold temps and early spring pests led to too much crop loss, burn-out, wasted seed, and damaged soil to justify the marginal early season gains in profit. Here on Whidbey Island, we now don’t direct sow much of anything outdoors until early April or March if it’s in a greenhouse.

So, what does this mean for you and your grand gardening goals? January is best for dreaming and scheming.  Perhaps build a new compost or worm bin, take a soil test, or level up your succession planting plan with some spreadsheets.  Research all the wonderful varieties offered by your regional seed companies and plan a mini variety trial.

Okay, so if January is off-limits for planting what about the rest of winter? February is perfect for starting onions and leeks indoors. March is ideal for starting tomatoes, peppers and eggplants indoors as well as hardy brassicas. If you have a greenhouse, you could begin direct seeding some greens and root crops. If these crops succumb to our NW winter blues, don’t fret, just try again in April! Our comprehensive NW planting calendar can be found here.

Posted on

Succession Planting

Folks often ask how we keep spinach and cilantro from bolting in the middle of summer or how we pull off lettuce all season long. Is it shade cloth? Constant irrigating? Secret farming sauce? The answer… succession planting (see how the word success is even in the name?!).

Whereas many backyard gardeners plant their whole garden in spring and call it good, farms and super productive gardens require more planning and planting. Some vegetables like winter squash or tomatoes should be planted just once as the growing season only has enough warm days for a single crop. Here at Deep Harvest, we plant most veggies multiple times throughout the season. This ensures they’re always in their fresh, vegetative state of growth when we need them. Take arugula, which we plant not once, not twice, but a whopping 16 times, March through September. Arugula bolts quickly, so this schedule is needed to ensure there’s always a bed of tender leaves for orders.

What about biennial crops like carrots and beets that don’t bolt their first year, you ask? Why not just plant all the carrots we need in March and harvest them throughout the entire season? Well, even root veggies don’t hold in the ground forever. After about a month, a mature carrot becomes a woody, hairy, split open, rust fly larvae-infested, or otherwise unsavory experience. Thus, we plant them every three weeks March through July to ensure they’re always prime. Another secret to effective succession planting is variety choice. Whereas our sweet, tender Hilmar makes a great spring/summer carrot, we favor Danvers for our final fall planting. It holds up much better in wet, cool soils. All the seeds in our Deep Harvest Seeds catalog perform well in our climate, but some need to be planted in the correct season to ensure a good crop.

If succession planting sounds like far too much effort, but you still dream of a bountiful gardening season, try planting crops that you can harvest for long harvest windows. Kale, chard, cucumbers, basil, zucchini, and tomatoes are the all-stars of Team Productivity. Go team!

Posted on

Life Cycle of Broccoli

I could’ve chosen any transplanted vegetable for this exercise, but broccoli is just so fun to say repeatedly. Broccoli starts as, yes, a seeds, and gets sown into a plastic cell tray with about 100 of their siblings. After 2-3 weeks of getting watered twice daily their roots begin to get bound up in the little cells. This means it’s time to transplant into the field.

The new bed has already been fertilized, chisel plowed and tilled to prepare for planting. Two rows of little holes are made down the length of the bed at 15 inch spacing with a dibbler. This demarks where the transplants will go.  One human walks down the bed, pulling transplants from the cell tray and dropping them near the holes while another human crawls behind on hands and knees, tucking them into the soil. The babies are promptly watered in and blanketed in row cover to protect from cabbage root maggot. Within a few days they are growing new roots down into the soil. Weekly watering ensues, either via sprinklers or drip lines (we use both for broccoli). We hope for not-too-hot of weather, so the plants don’t bolt prematurely.

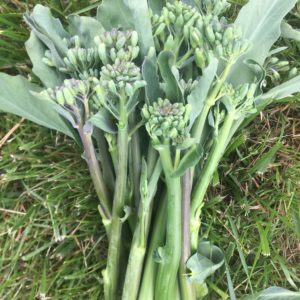
The broccolis usually need to be weeded twice  between planting and harvest. The first weeding is often accomplished with the electric Allis Chalmers G tractor, while the plants are small enough to fit between the cultivating knives. After a couple weeks the plants outgrow the tractor’s ability and must be weeded by hand or hoe. When the plants are several weeks old and about the size of a basketball, we remove the row cover as they’re no longer as susceptible to predation by insects. Finally, they begin to “button up”, sending tiny flower buds from their centers, and within 10 days those flower buds have grown into full broccoli heads. Hurray!

Posted on

Deciding what crops to grow

Deciding what crops to grow

We often decide whether to continue growing a crop year after year based on its general ‘gestalt’. It’s not the most data-driven process, but rather takes into consideration months or years of anecdotal observations and impressions. Was the crop productive relative to others of the same class (ie. roots, heading brassicas, fruiting summer crops, etc)? Was it more or less labor intensive (ie. did it take long to weed, harvest, trellis, prune, etc)? Do CSA members seem to like it? Or do they leave it in the trade bin at a higher rate that other crops?  While the last criteria is easy to gauge based on CSA member feedback, the first two criteria are easier to assess with enterprise budgets. These are the measurements and resulting calculations that go into determining the profitability of a specific enterprise within the greater business.

If we do a carrot enterprise budget, say, we measure the time taken sowing, weeding, harvesting and wash/packing a 125’ bed of carrots and multiply it by our average labor rate, as well as calculate the cost of materials (seeds, fertilizer, etc) applied to that bed.  After determining costs, we subtract that number from its gross profitability to get a net profit/bed. If we did that for a couple dozen crops we could then generate an average profit-per-bed rate to which we could compare all crops. If crops make less than that average we will grow them less frequently or drop them altogether. Unless, of course, CSA members love them.

Conversely, if the crop is relatively profitable, we should consider increasing its proportion in the field, or at least as long a CSA member keeping accepting it with glee. Enterprise budgets have never been our strong suit, requiring higher levels or organization than we’re typically able to muster during a busy farm season, but they are something to aspire toward.

Posted on

Tomato Tending

Thanks to a wet, mild June we’re still a little ways out from tomato season, but even still, we are spending an inordinate amount of time with our tomato plants. They’re kind of the divas of the farm scene. Every week, four 125ft beds of field tomatoes get string added to their t-post trellis system (check out “Tomato Florida Weave” if you want to see our technique) and 5 beds of greenhouse tomatoes get their two main stems gently twisted up strings tied to the greenhouses’ purlins to maximize airflow. Lower leaves and suckers get snipped off all tomato plants as does anything remotely damaged or diseased. With around 750 tomato plants, that’s a lot of time spent.

Do we really need to do all that? Indeedio, we think we do. The PNW just doesn’t get enough heat units to guarantee quality tomato production, so we really have to coddle and beg them to realize their potential for us. Without picking the right varieties and pruning off excess growth, they are very likely to fall victim to early blight, late blight, verticillium wilt, fusarium wilt, any number of other ailments, or just produce low yields or low quality fruit. Even with all this effort there’s no guarantee one of these fungal catastrophes won’t strike – it’s only happened twice in the 14 years we’ve served as Senior Tomato Cajolers. So far so good!

Posted on

To mechanize or not to mechanize, that is the question

There are a couple distinct ways of approaching one’s small farm business. One approach is to buy all the snazzy equipment right away and assume it will eventually pay for itself in saved labor. Of course this doesn’t always pan out. Some examples of such luxurious small farm tools include new tractors and tillers, snazzy flail mowers and finger weeder implements, paperpot seeders for the fields (look it up, they’re trending on small farms), the vacuum seeder for the propagation house (also fun to google), and the greens harvester to cut salad without bending over (yet again, mr. internet will answer your questions), etc. to infinity and beyond. I don’t know if you know this about us, but we are not those kind of farmers. We are proudly scrappy, making sure a new tool is beyond well-earned before making an investment. After digging over 5,000 feet of potatoes in our first seven years, we decided we’d earned a potato digger. (Could’ve made that minor purchase a couple of years sooner to save the ol backaroo!) After 9 years on a tractor from the 60s and saving up our parsnip pennies, we figured we were due for a tractor with 4WD and some legit horse power. Mighty helpful when driving around in soggy springs! Twelve years in, we deemed ourselves worthy of a grown-up propagation house for our plant babies rather than two hilariously cramped, gardener sized start houses. Until we know for sure a farm addition is really, definitely going to improve efficiency and financially payoff, we hold off. So out we go to the fields to transplant by hand, knowing it’s the right move, at least for us.