Posted on

Choosing Crops to Grow

What Crops and Why?

The last 15 years of farming are full of trials and errors, errors and trials, learning and growing and learning and… not growing. That’s a wordy way of saying, crops have come on and crops have gone off the farm plan for all kinds of reasons. The following are factors we consider when deciding if we’re going to grow a crop and if so how much we’ll plant of it.

One, do people like it? We use our trade zone of CSA pick-up each week as a mini member survey to see what you’re all leaving behind. A big pile of anything means it’s not likely to make the cut for next season, thus, the absence of mustard greens, celeriac, salsify and winter turnips in the shares this year. Can’t say we’re shedding any tears!

Two, is it profitable? This isn’t a huge factor when we plan our CSA harvests as we predominantly prioritize crops that are pleasing to your personal palettes and that contribute to a well-rounded and diversified farm share box. However, when choosing crops for the grocery stores, restaurants and food hub, this is THE consideration. We intentionally plant carrots, beets, chard, kale, broccoli, cauliflower, lettuce, cabbage and brussels sprouts for these causes as they are ever popular and fetch good rates on a per bed basis, making them worth the lower wholesale prices.

Three, how much space does it take up? We don’t grow tons of potatoes or melons on our farm as they don’t yield well, are prone to pest damage, take up a lot of room, and don’t come anywhere close to penciling out.

Four, do we personally like growing and managing them? Nathaniel has a deep passion (to which I cannot relate) for growing corn and quinoa for seed, but I support it! And I have a newfound love for growing giant pumpkins and have serious plan to host a giant pumpkin regatta next year- stay tuned! These crops don’t make sense financially, but we grow them to keep ourselves enthused. Claire, Kevin and I must’ve checked on our big quirky pumpkin friends a couple times a week throughout the summer. We miss them!

It’s a delicate dance to weigh all these factors when working on the season’s plan, but it makes for lively conversations over coffee in the off season.

Posted on

Seed Terminology and Labels: Open-Pollinated, Non-GMO, Hybrids, and Such

Annual Seed Spiel…Okay, we’re revisiting an oldie but goodie this week: Seed terminology and the common misconceptions around labels. As a small seed company we pride ourselves on strictly selling only open-pollinated, non-GMO and certified-organic seeds. What the heck to these terms actually mean and are they related? Let’s start with “open-pollinated,” a term referring to the way the plant reproduces.

Open-Pollinated

As opposed to “hybrid” or “F-1” varieties, open-pollinated varieties (OPs) are genetically diverse populations that are free to cross-pollinate within themselves. No plant is a poster child for the variety. Every individual’s genetic make-up is slightly different due to the free-flow of pollen (similar most wild species). You can save seeds on open-pollinated plants and get something that resembles the variety. You just need to save from enough plants to get a good representation of the variety’s diversity.

Hybrids

Hybrids come from two in-bred parent lines crossed by breeders to create a particular set of plant traits in the offspring. Seed saved from these hybrid plants will revert back to a hodgepodge of their parent traits. They often don’t resemble the desired plant at all. This benefits the breeder and seed company by removing the farmer from the seed work. This forces farmers to purchase the hybrid seed every year.  Think of open-pollinated varieties as the free-love plants, and hybrids as highly arranged marriages. We mostly grow OPs on the farm (maybe 90%). Still, it’s hard to find good OP varieties for crops like cauliflower due to a century long neglect of classical plant breeding in favor of hybrid development. Open a Johnny’s seed catalog and almost every vegetable is a hybrid.

While some hybrid breeding techniques border on “soft-GMO” by some definitions, hybrid varieties can be produced and sold as Certified Organic. Hybrids aren’t bad, per se, but the industry focuses on these varieties to the detriment of our collective ability to grow, save, and adapt our own OP seeds.

GMO

Okay, what about GMO and Organic? GMO (genetically modified organism) refers to a plant that’s inserted with one or more genes to create new traits, often to confer herbicide resistance, viral resistance or insect tolerance. They are almost exclusively used in commodity crops produced on a huge scale (think soy, canola, cotton, corn, sugar beets). GMO seed can’t be certified-organic. If I buy a packet of GMO corn seed and grow it with the most ecological, practices possible, it still couldn’t sell that corn as Organic. Organic Seed must be GMO-free and produced under strict practices defined by the National Organic Program of the USDA.

Now here’s where it gets a bit tricky. Many varieties, both OPs and hybrids, are grown for years using conventional practices, (ie. plenty of synthetic fertilizers and herb/pesticides.) That seed could be grown out for a single generation in a certified-organic environment and be sold as Certified-Organic. As long as it’s not GMO, Certified Organic tells you nothing addition about that variety’s underlying genetics or past environment. Many Certified-Organic varieties actually don’t do that well in organic conditions because they were not bred for those conditions. Conversely, plenty of non-organic heirloom varieties will do great in organic conditions since they were bred over 100 years ago, in the absence of modern chemicals. Now that’s interesting, aint it?

Posted on

Wireworms are at it again!

Arghhhh!

Our seasoned farm share members know their way around an ugly potato and we’re hoping the rest of you are up for the challenge as well. A few of this year’s potato beds have been discovered by… wireworms. Boooo. Hissss. But whatever! We’re cool, we’re cool. Dealing with pests is part of this organic farming game and we accept it. Life can’t be flowers and strawberries all the time!

So, a refresher on the orange, crispy, little larvae that share our love of potatoes. Wireworms are the babies of click beetles which are small, copper-colored beetles that thrive in pastures with high organic matter. Unfortunately, high organic matter soil is what we organic farmers also love.

When we first started farming our current property, they were a new pest to us and existed in our soil in truly catastrophic quantities. We planted around 10,000 lettuce transplants that first summer here (we were used to growing lettuce for the grocery stores) in hopes that maybe a new bed or later timing date might help our lettuce growing cause. Nope! We grew absolutely zero lettuce. Or corn. Or potatoes. Oh and we had to pick about five gross worms out of each of our brassica transplants’ roots a few weeks after planting them in order to pull off any broccoli, cabbage, kale, brussels or cauliflower. Talk about crazy making! We persevered and found things that worked better than others, CSA members were understanding, and we’re still standing!

The more we’ve worked our soil, the fewer wireworms we’ve had to deal with, but they’re around lurking in the fields edges, which leads us to this week’s potatoes. Potatoes MUST be their favorite food, (next to pasture grass roots) and are recommended as a wireworm trap crop. A trap crop is something grows with the purpose of attracting a pest away from something more precious. Too bad the ideal trap crop is the food crop we’re going for in this situation. Thankfully, the damage is fairly superficial, albeit hideous. If you can’t stand the looks of these ugly roots, trade em away, or just get out your peeler and enjoy the goodness just below the potato skins.

Posted on

Succession Planting

Folks often ask how we keep spinach and cilantro from bolting in the middle of summer or how we pull off lettuce all season long. Is it shade cloth? Constant irrigating? Secret farming sauce? The answer… succession planting (see how the word success is even in the name?!).

Whereas many backyard gardeners plant their whole garden in spring and call it good, farms and super productive gardens require more planning and planting. Some vegetables like winter squash or tomatoes should be planted just once as the growing season only has enough warm days for a single crop. Here at Deep Harvest, we plant most veggies multiple times throughout the season. This ensures they’re always in their fresh, vegetative state of growth when we need them. Take arugula, which we plant not once, not twice, but a whopping 16 times, March through September. Arugula bolts quickly, so this schedule is needed to ensure there’s always a bed of tender leaves for orders.

What about biennial crops like carrots and beets that don’t bolt their first year, you ask? Why not just plant all the carrots we need in March and harvest them throughout the entire season? Well, even root veggies don’t hold in the ground forever. After about a month, a mature carrot becomes a woody, hairy, split open, rust fly larvae-infested, or otherwise unsavory experience. Thus, we plant them every three weeks March through July to ensure they’re always prime. Another secret to effective succession planting is variety choice. Whereas our sweet, tender Hilmar makes a great spring/summer carrot, we favor Danvers for our final fall planting. It holds up much better in wet, cool soils. All the seeds in our Deep Harvest Seeds catalog perform well in our climate, but some need to be planted in the correct season to ensure a good crop.

If succession planting sounds like far too much effort, but you still dream of a bountiful gardening season, try planting crops that you can harvest for long harvest windows. Kale, chard, cucumbers, basil, zucchini, and tomatoes are the all-stars of Team Productivity. Go team!

Posted on

Bush Beans, Pole Beans and Dry Beans

Allow us a moment to wax (wax bean?) poetic about one of our favorite tastes of summer.

Garden fresh beans. What’s not to love? Stir-fried, sauted, fresh, roasted, pickled– there’s no way to do them wrong. Then why does the English language cast these tasty morsels in such a bad light?  Being “full of beans“ or never amounting to “a hill of beans” aren’t exactly compliments. Getting “beaned” in baseball is nobody’s definition of a good time. And calling someone a “bean counter” can be downright rude. Why the bad vibes, people? Maybe our language-creating ancestors only ate beans from aluminum cans. Literal food for thought… But I digress. Back to regular programming—- Garden fresh beans!

Did you know that there are different beans for different uses? To the culinistas (did we just invent a word??) out there, you may want to take some notes. Our catalog has a bean for every occasion:

Snap Bush Beans  – These produce concentrated harvests of juicy beans for fresh-eating, sautéing, freezing or canning. An early May sowing will give you 3-4 weeks of picking starting in July. If you want continued harvests through August and September, consider sowing second and even third successions in June and July. Provider and Buerre de Roquencourt are our earliest-to-mature varieties while the fancy French filet bean, Velour, needs 1-2 more weeks to set fruit. For those of you who are all about flavor, Lewis bush bean won our on-farm bush bean taste test- TWICE!

Snap Pole Beans – Pole beans are the quintessential garden crop. While they lack the speediness of bush beans they make up for it in prolonged yields all summer long.  Be sure to give them something to grab onto and climb up before they send out their vines. A back fence, bamboo stakes or twine draped from a trellis all work just fine. Kew Blue produces stunning semi-flat deep purple crunchy delights and Cobra’s green beans are the tastiest and earliest maturing pole beans we’ve found! Use ’em in any which way.

Dry Beans (Bush or Pole, but all our varieties are Bush) – These morsels are intended for a late summer harvest, after the plants have dried down and the beans are brown and crispy.  Our Rockwells are a Slow Food “Ark of Taste” variety, renowned for its delectability as a baked bean.  Dragon Langerie is juicy and tender for eating fresh and can also be dried or shelled.

Posted on

Plants for People and Pollinators

If you’re having trouble deciding what to grow this season, here’s a gratifying option to living up your landscape: plant things both people and pollinators adore! You can share!!

Get this, many veggies and herbs will go on to flower and attract a myriad of beneficial insects if you leave ‘em the ground long enough to do so. You’ve probably discovered this phenomenon all on your own, forgetting about that old arugula or salad mix until after it’s bolted and flowered and then – boom- it’s suddenly abuzz with life!

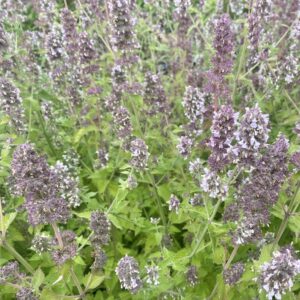
We often leave entire beds of broccoli and cilantro to continue growing waaayy past their harvest window (on purpose- no really!!), inviting in a diversity of bees, flies and beetles that in turn pollinate our other food crops and prey on pesky pests like aphids, mites and caterpillars.  Over-mature crops can even help to bolster native pollinator populations, many of which are in decline due to habitat loss and a lack of floral resources. If you have the space and a tolerance for a slightly messier garden appearance, consider leaving the following crops in the ground beyond the point of edibility:

Cilantro, Dill and Parsley: These three herbs are in the family Apiacea, known for its “umbel”-shaped flower heads which can attract a wide diversity of beneficial bees, syrphid flies and parasitoid wasps, which prey on aphids!! After cutting these plants back a few times for food they’ll start to bolt and flower. Just sit back and enjoy the magic!

Annual brassicas – arugula, mizuna, mustards, salad mix, tatsoi, choi sum and gai lan: These quick-to-mature leafy greens of the family Brassicacea are often the first to bolt in the garden, leading to a proliferation of white and yellow flowers. Bees or all shapes and sizes including honey bees, bumble bees, sweat bees and mason bees will find their way to these flowers.

Basil, Holy Basil and Catmint – These herbs are in the Mint family, producing spikes of gorgeous, purple flowers that bloom a good long while. Pinch the first few flowers off your basil plants to encourage branching, which will yield more pesto for you and flower production for the pollinators.

Edible Flowers The blooms of Calendula, Borage, Bachelor Buttons and Nasturtiums are all edible, adding bright colors and subtle flavor to your summer salads, drinks, and party cakes. They also happen to be some of the best pollinator crops out there! The butterflies and their friends will thank you (in their own subtle way).

One final word to the wise. While leaves and stems lead to flowers, flowers happen to lead to (drum roll, please)…seeds! Keep an eye on those plants as they’re blooming and consider yanking them before the first seed pods start drying down to prevent seed dispersal in your garden. That is, unless you want to try saving your own seeds or don’t mind volunteers next spring!

Posted on

How to Grow Cool Cucumbers and Superb Summer and Winter Squash

Seeding: Come May 1st, here on Whidbey Island we start cucumbers and summer squash seeds in 2” pots in our greenhouse on heat mats set at 75 degrees.  Sowing indoors allows us to get plants growing when the outdoor soil is still too cold, while also giving these crops a head start on the pests and weeds. If you don’t have a heat mat or greenhouse, a bright, warm window ledge should suffice. If you’d like to direct-sow cucumbers and squash, wait until the soil is at least 60 degrees, ideally a bit warmer.

Placing and Spacing: When cucurbits have filled out their 2” pot, we plant cucumbers outside spaced one foot apart and the squash between 18” and two feet apart, depending on type. Intuitively, summer squash require less room than giant vining winter squash. Both crops love full sun. We prefer growing long Asian and English cucumbers on trellising in the greenhouse to keep them straight and easy to pick, but you don’t have to.

Harvesting: To my serious chagrin, we need to harvest these crops every other day to get ‘em in their prime eating state. If you don’t mind a giant zucchini boat or slightly suboptimal cucumbers, you can get away with picking less frequently. CSA members, grocery store customers and chefs prefer these speedy growers small and firm, so at least two months of our summer our lower backs are feeling the burn as we fill bin after bin of these tasty fruits.

Posted on

Life Cycle of Broccoli

I could’ve chosen any transplanted vegetable for this exercise, but broccoli is just so fun to say repeatedly. Broccoli starts as, yes, a seeds, and gets sown into a plastic cell tray with about 100 of their siblings. After 2-3 weeks of getting watered twice daily their roots begin to get bound up in the little cells. This means it’s time to transplant into the field.

The new bed has already been fertilized, chisel plowed and tilled to prepare for planting. Two rows of little holes are made down the length of the bed at 15 inch spacing with a dibbler. This demarks where the transplants will go.  One human walks down the bed, pulling transplants from the cell tray and dropping them near the holes while another human crawls behind on hands and knees, tucking them into the soil. The babies are promptly watered in and blanketed in row cover to protect from cabbage root maggot. Within a few days they are growing new roots down into the soil. Weekly watering ensues, either via sprinklers or drip lines (we use both for broccoli). We hope for not-too-hot of weather, so the plants don’t bolt prematurely.

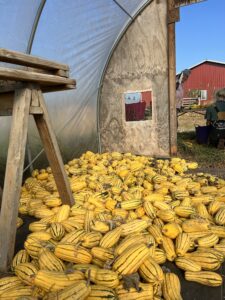
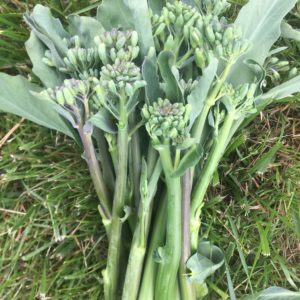
The broccolis usually need to be weeded twice  between planting and harvest. The first weeding is often accomplished with the electric Allis Chalmers G tractor, while the plants are small enough to fit between the cultivating knives. After a couple weeks the plants outgrow the tractor’s ability and must be weeded by hand or hoe. When the plants are several weeks old and about the size of a basketball, we remove the row cover as they’re no longer as susceptible to predation by insects. Finally, they begin to “button up”, sending tiny flower buds from their centers, and within 10 days those flower buds have grown into full broccoli heads. Hurray!

Posted on

Deciding what crops to grow

Deciding what crops to grow

We often decide whether to continue growing a crop year after year based on its general ‘gestalt’. It’s not the most data-driven process, but rather takes into consideration months or years of anecdotal observations and impressions. Was the crop productive relative to others of the same class (ie. roots, heading brassicas, fruiting summer crops, etc)? Was it more or less labor intensive (ie. did it take long to weed, harvest, trellis, prune, etc)? Do CSA members seem to like it? Or do they leave it in the trade bin at a higher rate that other crops?  While the last criteria is easy to gauge based on CSA member feedback, the first two criteria are easier to assess with enterprise budgets. These are the measurements and resulting calculations that go into determining the profitability of a specific enterprise within the greater business.

If we do a carrot enterprise budget, say, we measure the time taken sowing, weeding, harvesting and wash/packing a 125’ bed of carrots and multiply it by our average labor rate, as well as calculate the cost of materials (seeds, fertilizer, etc) applied to that bed.  After determining costs, we subtract that number from its gross profitability to get a net profit/bed. If we did that for a couple dozen crops we could then generate an average profit-per-bed rate to which we could compare all crops. If crops make less than that average we will grow them less frequently or drop them altogether. Unless, of course, CSA members love them.

Conversely, if the crop is relatively profitable, we should consider increasing its proportion in the field, or at least as long a CSA member keeping accepting it with glee. Enterprise budgets have never been our strong suit, requiring higher levels or organization than we’re typically able to muster during a busy farm season, but they are something to aspire toward.

Posted on

Fava Fever

Okay, what the heck are favas anyway? These oversized legumes look like they time travelled straight from the Jurassic. Fava beans are one of the only vegetable food crops double as a cover crop. They can be planted in the off-season to suppress weed growth and fix nitrogen. We don’t use them as a cover crop, however, due to the enormous seed size and therefore proportionately enormous volume of seed required to sow a field. On the other hand, their usefulness in the kitchen shouldn’t be overlooked, as their tender and nutty flavor goes great in several cuisines. Favas originate in the eastern Mediterranean and are considered one of the oldest cultivated crops. They were the only bean grown in the Europe before the arrival of American beans after 1492.

There is some debate over how to prepare fava beans. While most parts of the plant are edible to some degree, the culinary prize is the seed of the pod, (hereafter referred to as the beans). Some claim you can eat the beans with the waxy skins on if they are young and tender, but the majority opinion is to remove the skins before consumption, especially if the beans are mature and filling the pod (as they are in your share).

Remove the skin of each bean, you say? How tedious! Well, yes, this food is indeed a labor of love, however there are a few hacks to speed the process. Once removed from the pods, we like to blanch the beans in boiling water for one minutes and the drain. This will allow the beans to more easily slip from their skins. Another method is to soak the beans (removed from pods) overnight before skinning them.

Once podded and skinned, now you’re ready to prepare them in a dish. From here, you can steam them until tender and toss them in a mixture of salt, olive oil, and lemon juice. You can also grill them, or mash them and spread them on bruschetta, or fold them into mashed potatoes. They’re also a great addition to a green salad, a risotto dish, or pasta. You really can’t go wrong, as they’re delicious on their own with a bit of salt!