Posted on

How to Grow Cool Cucumbers and Superb Summer and Winter Squash

Seeding: Come May 1st, here on Whidbey Island we start cucumbers and summer squash seeds in 2” pots in our greenhouse on heat mats set at 75 degrees.  Sowing indoors allows us to get plants growing when the outdoor soil is still too cold, while also giving these crops a head start on the pests and weeds. If you don’t have a heat mat or greenhouse, a bright, warm window ledge should suffice. If you’d like to direct-sow cucumbers and squash, wait until the soil is at least 60 degrees, ideally a bit warmer.

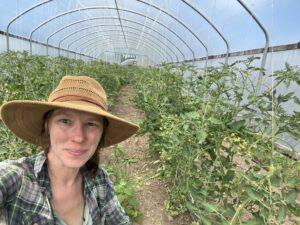
Placing and Spacing: When cucurbits have filled out their 2” pot, we plant cucumbers outside spaced one foot apart and the squash between 18” and two feet apart, depending on type. Intuitively, summer squash require less room than giant vining winter squash. Both crops love full sun. We prefer growing long Asian and English cucumbers on trellising in the greenhouse to keep them straight and easy to pick, but you don’t have to.

Harvesting: To my serious chagrin, we need to harvest these crops every other day to get ‘em in their prime eating state. If you don’t mind a giant zucchini boat or slightly suboptimal cucumbers, you can get away with picking less frequently. CSA members, grocery store customers and chefs prefer these speedy growers small and firm, so at least two months of our summer our lower backs are feeling the burn as we fill bin after bin of these tasty fruits.

Posted on

Life Cycle of Broccoli

I could’ve chosen any transplanted vegetable for this exercise, but broccoli is just so fun to say repeatedly. Broccoli starts as, yes, a seeds, and gets sown into a plastic cell tray with about 100 of their siblings. After 2-3 weeks of getting watered twice daily their roots begin to get bound up in the little cells. This means it’s time to transplant into the field.

The new bed has already been fertilized, chisel plowed and tilled to prepare for planting. Two rows of little holes are made down the length of the bed at 15 inch spacing with a dibbler. This demarks where the transplants will go.  One human walks down the bed, pulling transplants from the cell tray and dropping them near the holes while another human crawls behind on hands and knees, tucking them into the soil. The babies are promptly watered in and blanketed in row cover to protect from cabbage root maggot. Within a few days they are growing new roots down into the soil. Weekly watering ensues, either via sprinklers or drip lines (we use both for broccoli). We hope for not-too-hot of weather, so the plants don’t bolt prematurely.

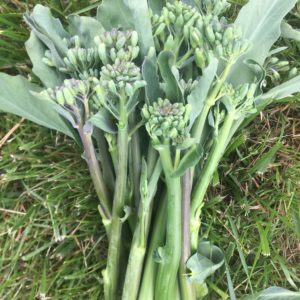
The broccolis usually need to be weeded twice  between planting and harvest. The first weeding is often accomplished with the electric Allis Chalmers G tractor, while the plants are small enough to fit between the cultivating knives. After a couple weeks the plants outgrow the tractor’s ability and must be weeded by hand or hoe. When the plants are several weeks old and about the size of a basketball, we remove the row cover as they’re no longer as susceptible to predation by insects. Finally, they begin to “button up”, sending tiny flower buds from their centers, and within 10 days those flower buds have grown into full broccoli heads. Hurray!

Posted on

Deciding what crops to grow

Deciding what crops to grow

We often decide whether to continue growing a crop year after year based on its general ‘gestalt’. It’s not the most data-driven process, but rather takes into consideration months or years of anecdotal observations and impressions. Was the crop productive relative to others of the same class (ie. roots, heading brassicas, fruiting summer crops, etc)? Was it more or less labor intensive (ie. did it take long to weed, harvest, trellis, prune, etc)? Do CSA members seem to like it? Or do they leave it in the trade bin at a higher rate that other crops?  While the last criteria is easy to gauge based on CSA member feedback, the first two criteria are easier to assess with enterprise budgets. These are the measurements and resulting calculations that go into determining the profitability of a specific enterprise within the greater business.

If we do a carrot enterprise budget, say, we measure the time taken sowing, weeding, harvesting and wash/packing a 125’ bed of carrots and multiply it by our average labor rate, as well as calculate the cost of materials (seeds, fertilizer, etc) applied to that bed.  After determining costs, we subtract that number from its gross profitability to get a net profit/bed. If we did that for a couple dozen crops we could then generate an average profit-per-bed rate to which we could compare all crops. If crops make less than that average we will grow them less frequently or drop them altogether. Unless, of course, CSA members love them.

Conversely, if the crop is relatively profitable, we should consider increasing its proportion in the field, or at least as long a CSA member keeping accepting it with glee. Enterprise budgets have never been our strong suit, requiring higher levels or organization than we’re typically able to muster during a busy farm season, but they are something to aspire toward.

Posted on

Fava Fever

Okay, what the heck are favas anyway? These oversized legumes look like they time travelled straight from the Jurassic. Fava beans are one of the only vegetable food crops double as a cover crop. They can be planted in the off-season to suppress weed growth and fix nitrogen. We don’t use them as a cover crop, however, due to the enormous seed size and therefore proportionately enormous volume of seed required to sow a field. On the other hand, their usefulness in the kitchen shouldn’t be overlooked, as their tender and nutty flavor goes great in several cuisines. Favas originate in the eastern Mediterranean and are considered one of the oldest cultivated crops. They were the only bean grown in the Europe before the arrival of American beans after 1492.

There is some debate over how to prepare fava beans. While most parts of the plant are edible to some degree, the culinary prize is the seed of the pod, (hereafter referred to as the beans). Some claim you can eat the beans with the waxy skins on if they are young and tender, but the majority opinion is to remove the skins before consumption, especially if the beans are mature and filling the pod (as they are in your share).

Remove the skin of each bean, you say? How tedious! Well, yes, this food is indeed a labor of love, however there are a few hacks to speed the process. Once removed from the pods, we like to blanch the beans in boiling water for one minutes and the drain. This will allow the beans to more easily slip from their skins. Another method is to soak the beans (removed from pods) overnight before skinning them.

Once podded and skinned, now you’re ready to prepare them in a dish. From here, you can steam them until tender and toss them in a mixture of salt, olive oil, and lemon juice. You can also grill them, or mash them and spread them on bruschetta, or fold them into mashed potatoes. They’re also a great addition to a green salad, a risotto dish, or pasta. You really can’t go wrong, as they’re delicious on their own with a bit of salt!

Posted on

Tomato Tending

Thanks to a wet, mild June we’re still a little ways out from tomato season, but even still, we are spending an inordinate amount of time with our tomato plants. They’re kind of the divas of the farm scene. Every week, four 125ft beds of field tomatoes get string added to their t-post trellis system (check out “Tomato Florida Weave” if you want to see our technique) and 5 beds of greenhouse tomatoes get their two main stems gently twisted up strings tied to the greenhouses’ purlins to maximize airflow. Lower leaves and suckers get snipped off all tomato plants as does anything remotely damaged or diseased. With around 750 tomato plants, that’s a lot of time spent.

Do we really need to do all that? Indeedio, we think we do. The PNW just doesn’t get enough heat units to guarantee quality tomato production, so we really have to coddle and beg them to realize their potential for us. Without picking the right varieties and pruning off excess growth, they are very likely to fall victim to early blight, late blight, verticillium wilt, fusarium wilt, any number of other ailments, or just produce low yields or low quality fruit. Even with all this effort there’s no guarantee one of these fungal catastrophes won’t strike – it’s only happened twice in the 14 years we’ve served as Senior Tomato Cajolers. So far so good!

Posted on

Radicchios and other Chicories

Radicchio. More like RADicchio. We love it and you may not… YET… love it, but perhaps you’re up for giving it another shot? Maybe you just haven’t found the recipe for you. Radicchio is still the trendiest crop in foodie-ville. Seattle’s hippest restaurants go all out for their annual Chicory Week, the hottest cold weather food celebration this side of the Mississippi. Long time CSA members have heard it all from me before. “Bitter is Better.” “Radicchio is full of anthocyanins, vitamin K, and micronutrients.” “It’s beyond incredible on pizza, pasta, salad, soups.” “They’re super expensive at the store, so especially precious in your share.” “The Italians love ‘em and you can’t argue with their cuisine!” and on and on…

Nathaniel and I are smitten with these beautiful leafy delicacies and we yearn for you to be, too. No worries if it’s not going to happen. They are indeed strong flavored, but you like strong, bitter coffee, don’t you? Eh? Anyway… We’re giving you a choice of chicories (radicchio, escarole and endive are all chicories) in hopes you can find one you’ll enjoy. Here’s the rundown of the options we’re offering this week.

Frisee: These light green, frilly heads are also known as Curly Endive. Frisee is mostly used in salad, especially in Salad Lyonnaise https://www.saveur.com/article/Recipes/Frisee-Salad-with-Poached-Eggs-and-Bacon/ and is one of the milder options in the chicory family.

Treviso: Football shaped and deep maroon, this is another mild-ish chicory and one that we love to sear or roast with balsamaic like this: https://www.marthastewart.com/346023/roasted-radicchio.

Sugarloaf: Considered by some to be the gateway radicchio, due to it’s mild and sweet flavor. It resembles a Napa Cabbage with it’s tall, lime green appearance. If you need some inspiration, give this a try: https://vancouverradicchiofestival.ca/portfolio-item/sugarloaf-pasta-with-lemon-and-almonds/

Adige Medio: This “Lusia-type” radicchio is round, light green/cream head with pink speckles and is often eaten raw in autumn salads with persimmons (https://beyondsweetandsavory.com/castelfranco-radicchio-persimmon-salad-with-blue-cheese-and-hazelnuts/#recipe), fennel and/or oranges. That bitter taste (in all radicchio) is due to a chemical compound called guaianolide: an antibacterial, antimalarial and anti-inflammatory in time for the first frosts of autumn. It’s also great cooked in risotto because it’s more delicate than red radicchios.

Posted on

How to Best Store Winter Vegetables

We’re here today to tell you how your Deep Harvest farmers store our beloved winter vegetables and what you could personally do potentially do to really maximize a crop’s longevity in your kitchen. Since we’re not getting a ton of any one item, we’re guessing you won’t need to be storing goods for all that long so don’t stress. These veggies are built to last!

Roots- Mixed roots store best if dry and at 32-40 in plastic bags in your fridge. People really swear by these green storage bags, but we’ve never tried them: https://www.debbiemeyer.com/. You could also make a bunch of soup or stew and freeze that. Here’s a great article that lays out how to go about doing so. Your future self will thank you!!! https://www.thekitchn.com/how-to-freeze-soup-23397915

Cabbage Your farmers keep cabbage in a plastic bag wherever we can fit it in our fridge. We also make a ton of kraut https://www.thekitchn.com/how-to-make-homemade-sauerkraut-in-a-mason-jar-193124 and kimchi, which will store in your fridge for a few months.

Brussels– We store these like the cabbage. Plastic bag, fridge. You may also freeze them, by blanching in boiling water 3-5 minutes, then putting directly into ice water, then drying them, freezing flat on a freezer sheet, and then storing in a plastic bag (more details here: https://poshjournal.com/how-to-blanch-brussels-sprouts. We’ve never done this as they can last fresh in the fridge for 3-5 weeks, if your fridge is around 32 degrees. At 41F they’ll store around 2-3 weeks- a good while either way!

Potatoes– Your local Deep Harvest farmers just keep em in a bowl on our counter. After a couple weeks, they do get green, which makes them unhealthy to eat, so this is suboptimal! If they don’t turn green but just sprout a smidge, we’re really not bothered and just break off the sprouts and enjoy em. This article from the food network says it’s fine to eat potatoes that have sprouted https://www.foodnetwork.com/how-to/packages/help-around-the-kitchen/sprouted-potatoes-safe-to-eat . If you care to be more responsible, store then in a cool, dry place- perhaps a paper bag in your pantry or a drawer in your kitchen. Don’t let them freeze as they prefer temps between 42-50F. If you want to freeze your potatoes for extra safe and delicious keeping, you could make hash browns following this recipe: https://www.justapinch.com/recipes/side/side-other-side-dish/how-to-make-your-own-frozen-hash.html.

Squash– These puppies can store 2-6 months at 50-55 degrees. Over the years, we’ve mostly just stored them in our unheated garage in crates, which has worked pretty darn well. A basement or pantry would be good too and a counter is actually probably just fine if it’s not close to your stove. If you wanted to make something fun out of a bunch of squash soon, this refrigerator or freezer squash butter makes a great gift. It’ll last in the fridge many weeks or in the freezer for months: https://gourmandeinthekitchen.com/maple-spice-squash-butter-recipe/

Onions and Garlic- These both want to be in a cool, dry, well-ventilated spot between 45-55 degrees. We just leave em on our counter and that works ok too, but at some point they start sprouting and then we eat them quick! We’ve also made minced onions (https://www.backtoourroots.net/how-to-make-homemade-dried-minced-onions/) and garlic salt (https://www.acouplecooks.com/herb-and-garlic-salt/) for gifts and for our own eating pleasure, which were well loved by all!

If you want to go the exta mile, you can get nerdy about vegetable storage with this helpful resource!

https://chemung.cce.cornell.edu/resources/storage-guidelines-for-fruits-vegetables

Have fun, all. Happy eating! Happy winter! We love ya!!

Posted on

The Importance of Regionally Grown Seed

Hey, that’s a fair question! Thanks to whoever telepathically sent it. I have a feeling you know what us regionally-focused seed growers are going to say, but then again, maybe not! We try to be straight talkers over here and want you to have the facts whether they serve us or not.

While of course we’d be giddy if folks got all their seeds from local seed companies, buying regionally appropriate varieties matters more for some crops than for others. For example, if you plant whatever lettuce, spinach, or radish seed your local hardware store sells, you’ll probably do just fine. Those are quick, easy crops that don’t require a long ripening period or a ton of heat units to do their thing.

However, random tomato, pepper, eggplant, melon, corn and winter squash varieties are higher risk propositions. Ripening Brandywine Tomatoes in Tacoma or California Bell Peppers in Portland are far from guaranteed. However, with a Scotia Tomato (named for chilly Nova Scotia) or a Mini Red Bell Pepper (nice and small for quick ripening) Northwesterners and other cooler location growers have a high chance of high yields. The shorter the Days to Maturity the merrier for these heat lovers.

So yes, you can grow watermelons in Washougal, WA, so long as it’s the right variety.

Posted on

Stratification, Scarification, and Vernalization- oh my!

Did you hear the birdies start chirping last week? Here at Deep Harvest, the robins are back to singing sweet songs of cereal (their AM chirps sounds like “cherrio, cherrio”) and the sun is showing its face. We know this means that you likely want to get your hands popping seeds into that cold muckiness. Ok, ok- at this point, we’ll allow it.

Lucky for you eager growers, some flowers actually like the cold soil. Who are these brave blooms? They go by the names Poppy, Larkspur, Rudbeckia, Catmint, Chamomile, Eryngium, Sweet Pea and Nasturtium. They’re the open-ocean swimmers of the flower world, not only tolerating frigidness, but even basking in it. (I’m an open water swimmer of the human world, so I understand!). We direct sow all these seeds in early to mid-March. However, if you’ve had trouble getting any of the aforementioned flowers to germinate, you might want to take tending to them to the next level. This crew appreciates being stratified or scarified! Eeee. Sounds scary, but it’s merely scar-y. Here’s the skinny on how to grow the frigid-est of flowers.

Stratification is a process of seed stimulation to promote germination. Most seeds experience dormancy as embryos, which must be broken somehow. In nature, seeds spend significant time in the ground during winter rains and frost which softens their seed coats. In your home, you can mimic this process by dampening a paper towel,  sprinkling the seeds on it and folding the towel around the seeds. Place this bundle in a labeled plastic bag, seal it, then mark your calendar so you remember to take them out of the fridge after a month! At that point, you can start your flowers as you normally would. Larkspur, Rudbeckia, Catmint, Chamomile, Eryngium all may benefit from this process.

Scarification: Some seeds have extremely hard, protective coats, which can make it difficult for them to germinate. The whole point of a seed having a tough coat is to prevent it from germinating at the wrong time. To overcome this protective mechanism, you can nick the seed with sandpaper or an emery board. You can also just soak them in water overnight before planting. That causes seeds to swell, which in turn breaks the outer seed coat. Sweet Peas and nasturtium may benefit from this process. At Deep Harvest, we always pre-soak our sweet peas, whose coats are particularly hardcore.

You may also have heard of Vernalization which is process that initiates flowering in plants (rather than germination of seeds) by exposing them to prolonged cold temps. Vernalization doesn’t apply to seed starting, but if you’re interested in growing root crops for seed, explore this concept further here: https://www.growveg.com/guides/vernalization-of-winter-vegetables-for-seed-saving/

Posted on

Seed Saving as Plant Breeding

While folks usually don’t use the term ‘plant breeding’ when referring to the simple act of seed saving, indeed that’s what it is. Each time a you save a variety for seed, you put a unique pressure on these plants to grow and adapt to your whims. Whether melons are grown for seed in a high tunnel or out in the windy fields impacts if plants will mature fruit and pass on seed to future generations. Our culinary preferences for fruit quality determine the genes passed down. Will they impart juiciness, sweetness and/or firmness? Choosing a few plants to save for seed from a large population is a breeding technique called ‘mass selection’ and has driven the evolution of our food crops for millennia.

Now, breeding completely NEW varieties usually entails more than mere selection, instead requiring novel “crossing.” For cross-pollinating crops like broccoli and spinach, this is simple: just plant two varieties near each other and wait for insects or wind (depending on their pollination mechanism) to carry the pollen between the two. Self-pollinating crops like tomatoes and peppers may require the physical transfer of pollen with a q-tip between plants, since the flowers don’t readily release pollen into their environment. This year at Deep Harvest we’ll be playing with the pollen of lettuce, nasturtiums and winter squash, making novel crosses and creating diverse, new genepools from which we can select out plants in future generations.

Want to do some easy plant breeding of you own? Many of our colleagues have already taken the first step for you by crossing multiple varieties together and selling the resulting diverse gene pools, or ‘grexes’. You can plant out these seeds and make selections based on your own unique growing conditions or preferences. It may take several seasons of selection for the genetics to stabilize into a  more predictable and uniform variety, but the journey itself is rewarding and fascinating! Check out Wild Garden Seed, Adaptive seeds and Experimental Farm Network to dive into this wild world. Carol Deppe’s book “Breed your own Vegetable Varieties” is the quintessential primer for folks excited to learn about backyard plant breeding. And finally, Cornell University has a great one-pager on the same subject.